Hanging garlands around a doorway is a simple yet impactful way to elevate your seasonal home decor.
Whether for Christmas, weddings, or year-round charm, garlands frame an entry with warmth and style.
From lush greenery with twinkling lights to minimalist designs with ribbon or beads, the right approach can complement any interior design aesthetic.
Proper placement, secure fastening, and balance are key to ensuring your garland looks polished and inviting.
In this guide, you’ll discover practical tips, creative styling ideas, and designer-approved methods to hang a garland beautifully around a doorway, adding a festive and welcoming touch to your home.
You don’t need to be a pro to pull this off. The trick is picking the right garland for your space, prepping the doorway so it’ll hold, and using the right hooks, clips, or ties.
Choosing the Right Garland for Your Doorway
When picking out a garland, it’s worth thinking about fit, style, and how long you want it to last. The material, size, and look all matter, and honestly, it’s about what feels right for the vibe you want.
Types of Garlands: Faux vs. Fresh
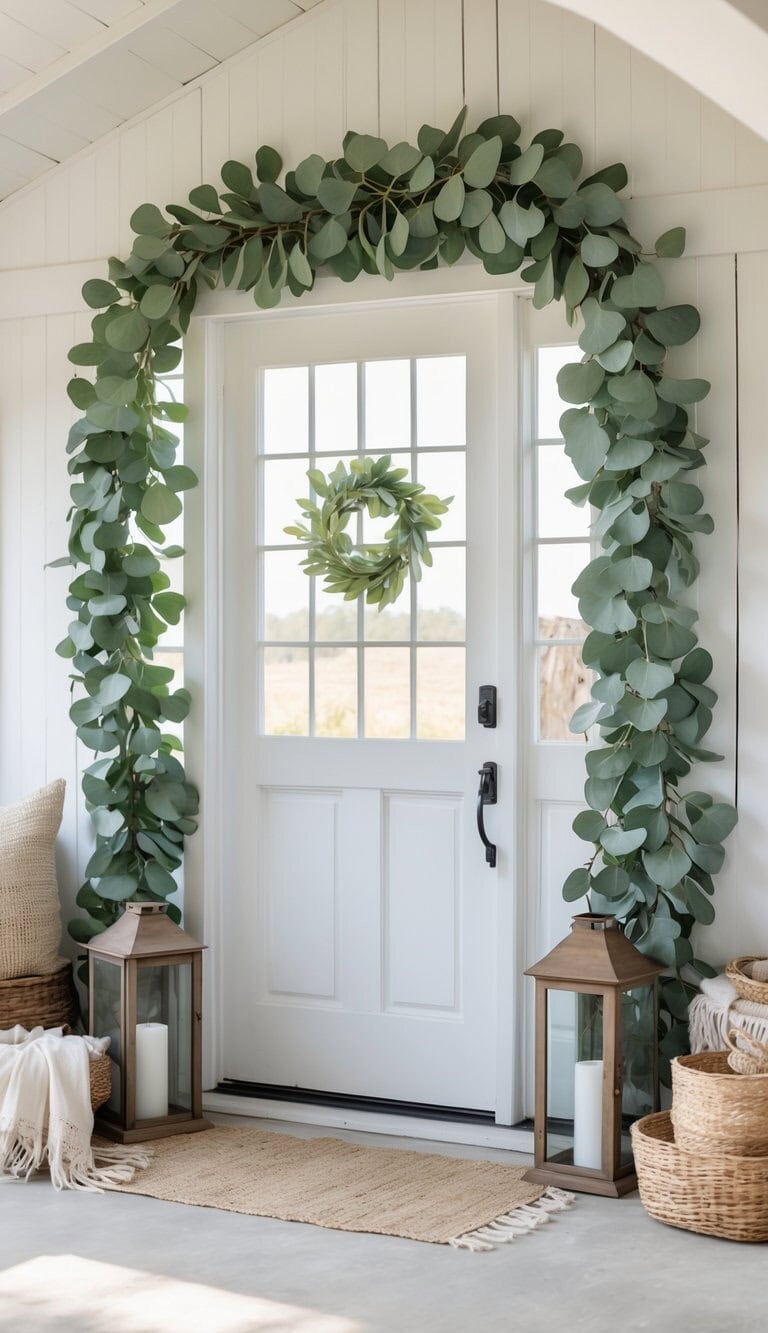
Fresh garlands bring in that natural scent — so classic, especially for Christmas. It looks great, but it can dry out fast, especially in warm rooms or sunny spots.
You’ll want to mist it with water to keep it looking good a little longer.
Faux garlands are the low-maintenance option. It’s usually made of plastic or fabric and sometimes comes with lights or decorations already attached.
No needles to clean up, no watering, and you can use it again next year.
Here’s a quick breakdown:
| Type | Pros | Cons |
|---|---|---|
| Fresh | Natural scent, authentic look | Short lifespan, needs care |
| Faux | Reusable, low-maintenance, pre-decorated options | Lacks natural scent, can look artificial |
It really just depends — do you want that real, woodsy feel, or is convenience more your thing?
Measuring and Sizing for a Perfect Fit
Before buying, grab a tape measure. Most doors are about 36 inches wide and 80 inches tall, but it never hurts to check.
To wrap the top and both sides, you’ll usually need around 9 feet of garland. If you want a more dramatic swoop or drape, go for 12 feet or more.
A tight fit needs less, but for curves and fullness, a little extra is always better than not enough.
Don’t forget thickness. A chunky garland can overwhelm a narrow doorway, while a skinny one might look lost on a big frame. Matching the size keeps things from looking awkward.
Selecting Seasonal or Themed Garland
Pick a garland that matches the season or your event.
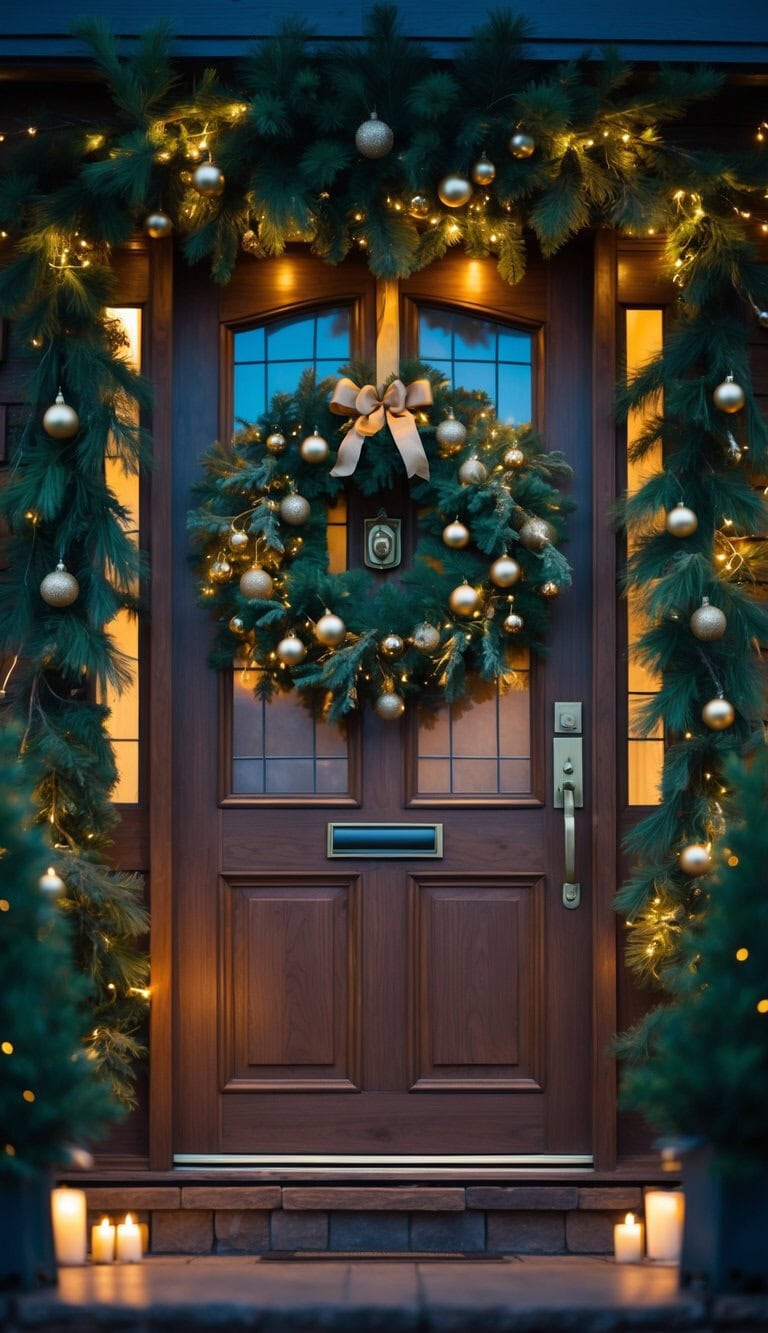
- Pine or cedar is perfect for Christmas — especially if you want to add ornaments or twinkle lights.
- Spring calls for lighter greenery and pastel floral touches.
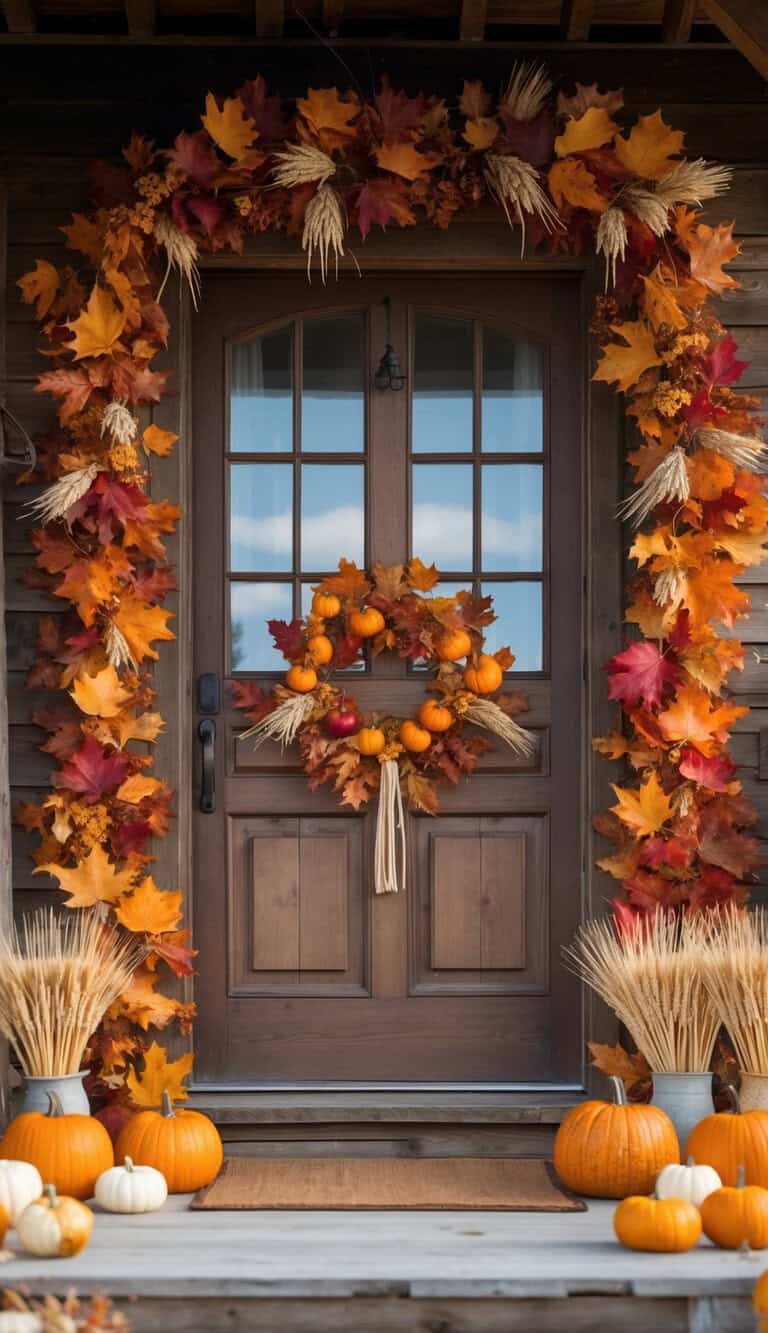
- For fall, try garlands with leaves, berries, or even little pumpkins.
- Summer looks good with vibrant colors like sunflowers and citrus slices or cool and calm decor like driftwood and shells.
Faux garlands sometimes come pre-decorated for different holidays, which makes swapping them out a breeze.
Choosing a theme also helps everything look intentional, not just thrown together.
If your home’s style is modern, eucalyptus or something simple might work best. For a more classic look, evergreen with lights is a safe bet.
Preparing Your Doorway for Garlands

Before you start hanging, make sure the doorway is clean and ready. A smooth surface helps hooks stick and keeps the garland from slipping.
The type of door frame matters, too — brick, wood, and vinyl all need different hardware.
Cleaning and Prepping the Surface
Dust and dirt can make garland slip right off.
- If you’re working outside, wipe down the trim or siding with a damp cloth and let it dry.
- For tough spots, a little soap and water does the trick, but skip harsh cleaners that could mess up the paint.
- Loose paint or cracked wood can be a problem for hooks or adhesive strips. If you spot flaking, a quick sanding or touch-up helps a lot.
- Adhesive hooks only stick if the surface is bone dry. Test one hook first before going all-in.
Assessing Doorway Structure and Material
Not all doorways are created equal.
- For brick or stone, try removable brick clips instead of drilling holes.
- On vinyl siding, look for siding-specific hooks — they won’t leave a mark.
- For wood trim, you can use small nails or cup hooks if you’re okay with tiny holes.
If you’re not sure what you’re working with, check the trim edges or ask someone who knows. Using the wrong hardware can either damage your doorway or just not hold up.
Weight matters too. A light faux garland might only need adhesive hooks, but fresh evergreens are heavier and need something stronger.
Hanging Methods: Tools and Materials
There are a few easy tools that’ll help you hang garland without wrecking your walls or trim. Each has its place, depending on what you’re working with.
Using Adhesive Hooks for Damage-Free Hanging
Adhesive hooks are a lifesaver for smooth surfaces — painted walls, wood, glass, you name it. They come off clean, so no worries about holes or marks.
Just make sure the hooks can handle your garland’s weight. Lighter garlands need only small hooks; heavier ones need something more robust.
Clean the surface with rubbing alcohol, stick the hook on, and wait an hour before hanging anything. That way, the adhesive has time to set.
You can get them in clear or white so they’re not too obvious. Use a few, spaced out, to prevent sagging.
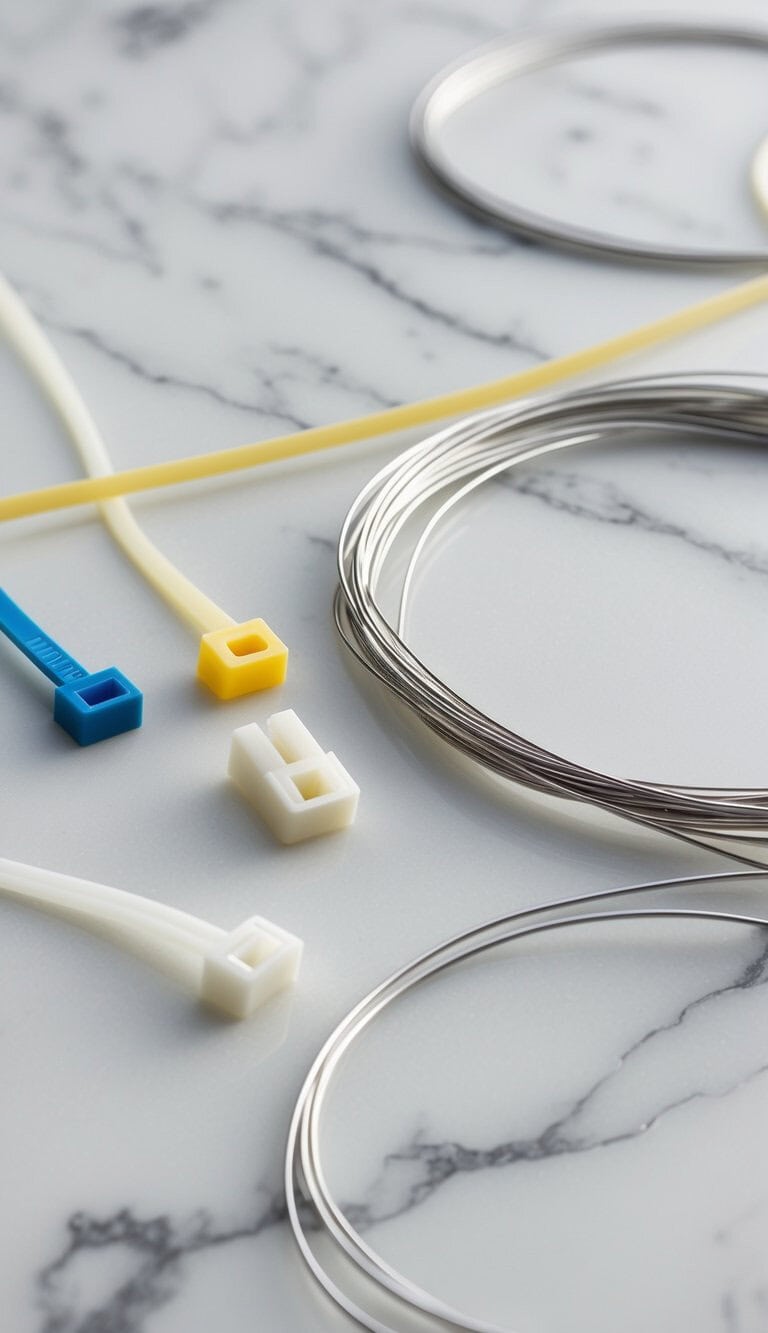
Securing With Zip Ties and Clear Zip Ties
Zip ties are strong and super handy, especially outside. Loop them around railings, columns, or wire frames.
Clear ones blend in, so they don’t distract from your decorations. Snip off the ends so nothing’s poking out.
Just remember, zip ties are a one-time deal — once you cut them, they’re done. If you might want to move things, don’t tighten them all the way at first.
For long garlands, space zip ties every foot or so to keep things tidy.
Attaching With Floral Wire
Floral wire is flexible and almost invisible, which is great if you want a natural look. Twist it around hooks, nails, or the garland itself to keep things in place.
You can easily adjust the garland without taking everything down.
Cut pieces of wire ahead of time — about 6 to 8 inches is usually enough. Wrap the wire tight, twist the ends, and you’re set.
It comes in different colors too, so you can match your garland or background.
For a doorway, three points — top and both sides — usually do the trick.
Step-by-Step Guide To Hanging a Garland Around a Doorway

Hanging a garland should look good, stay put, and not mess with the door’s function. Planning the drape and using the right tools makes all the difference.
1. Planning the Placement and Drape
- Figure out how you want the garland to frame the doorway. Do you want the garland to hang straight or curve gently?
- Lay the garland on the floor first to check the length and adjust decorations. If you’re adding lights, wrap them around before you hang it.
- Starting from the center and working down both sides helps keep it balanced.
2. Attaching Garland to the Doorframe
- Put hooks or clips at the top center and both sides. For heavier garlands, add a couple more for support.
- Secure the garland with floral wire or zip ties. Wrap them tight enough to hold, but not so tight they crush the greenery.
3. Ensuring Stability and Safety
- Make sure the garland isn’t blocking the door or dragging on the floor. You definitely don’t want anyone tripping.
- If it feels wobbly, add more ties or adjust the hooks. For outdoor setups, more attachment points help with wind.
- If you’re using lights, keep cords tucked away or taped down. A quick double-check means you can enjoy your decorations without worrying about mishaps.
Adding Decorative Touches and Embellishments

Now for the fun part — personalizing your garland. Add ornaments, ribbons, or twinkle lights to make it pop and tie everything together with the rest of your decor.
Incorporating Ornaments and Ribbons
Lightweight, shatterproof ornaments are honestly the way to go — they won’t drag the greenery down or make things feel clunky.
It helps to space ornaments out along both sides of the doorway. Hanging them in little clusters of two or three looks more natural than lining them up.
Ribbons are another easy trick for dressing up a garland. Wide wired ribbon holds its shape and can be tied into bows or woven through the greenery, which is always a nice touch.
Picking ribbon colors that match a wreath or the rest of the indoor decor just makes everything feel more put together.
A classic mix of red ribbon, gold ornaments, and greenery never really goes out of style. But there’s nothing wrong with keeping it neutral for a softer vibe if that’s your thing.
Lighting Up Your Garland
Adding lights gives the garland a cozy glow around the doorway.
- LED string lights are usually the best bet — they don’t get hot and won’t run up the energy bill. You can find them in warm white or multicolor, so there’s room to play with the mood.
- It’s easiest to start at the top center of the garland and work down both sides. Wrapping the lights loosely keeps them visible and lets the greenery peek through. If the garland’s extra thick, try tucking some bulbs inside for a bit more depth.
- For outdoors, definitely stick with weather-safe lights and use extension cords made for outside. Timers are a lifesaver — they’ll turn the lights on and off so you don’t have to think about it.
- A single strand of 100–150 lights usually covers a standard doorway. If your frame’s wider, you might need more.
Tips for Maintaining and Removing Garland
Garlands look best when they stay secure and fresh and come down without wrecking the doorway. A few easy habits and the right tools really help.
Keeping Garlands Fresh and Secure
If you’re using fresh greenery, misting it lightly with water every few days helps slow down drying. Needles and leaves won’t drop as fast that way.
For securing a garland, it’s better to use methods that hold up but won’t damage anything. Zip ties work well for stair rails or banisters, since they’re strong and pretty much disappear behind the branches. On doorways, adhesive hooks or a tension rod are easy options. No need for nails or screws.
Check the garland once a week. Tighten any loose ties or adjust hooks before they slip.
If the garland starts to feel heavy, add a few extra hooks. This spreads out the weight and keeps it from sagging.
A little upkeep really does go a long way in keeping everything looking neat.
Safe Removal Without Damage
When it’s time to take garland down, it’s worth going slow. Yanking it off can pull paint or mess up trim, and nobody wants that.
- If you used adhesive hooks, follow the directions. Pull the tab straight down to pop it off cleanly. Rushing here? That’s how you end up with sticky gunk or chipped paint.
- For zip ties, just grab some scissors or wire cutters and snip each one. Trying to slide them off might scratch the wood or metal, so honestly, it’s not worth the risk.
- If you used wire, ribbon, or twine, untying it keeps the surface underneath looking good. It might take a minute, but it’s better than scraping off marks later.
- Once everything’s down, give the doorway or railing a quick wipe. There’s usually dust, pine needles, or maybe a bit of leftover adhesive hanging around.
- If you used fresh greenery, now’s the perfect time to sweep up before those needles end up everywhere.