Transforming an artificial Christmas tree with a soft, snowy finish is one of the easiest ways to elevate your holiday décor, and flocking makes all the difference.
Whether you love a light dusting of snow or a full winter-wonderland look, learning how to flock an artificial tree gives you complete control over your style while keeping things mess-free and budget-friendly.

In this guide, we’ll walk you through the best products to use, simple step-by-step techniques, and essential tips for achieving a realistic, long-lasting snowy effect.
With a little preparation and the right approach, you can refresh last year’s tree, enhance your holiday theme, and create a cozy, festive centerpiece that feels professionally styled.
Understanding Flocked Artificial Christmas Trees

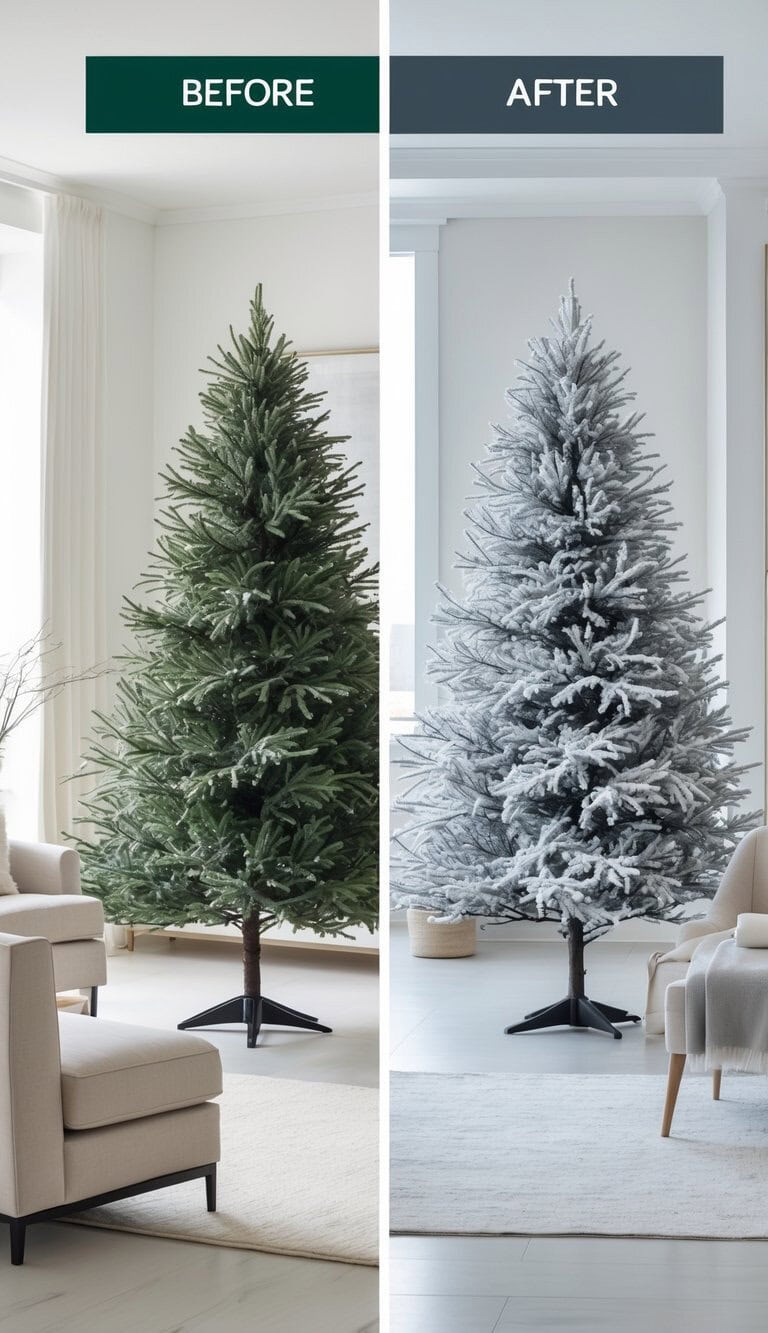
A flocked artificial Christmas tree gives us that snowy look without the hassle of a real tree. It really changes the whole style of our holiday décor and adds a soft, wintry feel.
What Is a Flocked Christmas Tree?
A flocked Christmas tree is just an artificial tree coated with a white material that looks like snow.
The “flocking” is usually a powder or spray that sticks to the branches when you mist them with water. This coating can be a light dusting or a thick, frosted layer.
Some trees are barely flocked, so you can still see green, while others are almost totally white.
You can buy pre-flocked trees, but honestly, doing it yourself gives you control over how thick or natural the snow looks.
Flocked trees don’t shed like real snow, but if you handle them roughly, a bit of flocking can come off. It’s worth setting them up gently and storing them somewhere dry.
Benefits of Flocking an Artificial Tree
Flocking adds a style that plain artificial trees just don’t have. The snowy look makes the tree stand out, even before we hang a single ornament.
It also creates a softer background for decorations. Ornaments, garlands, and lights really pop against the white, way more than they do on dark green branches.
Another perk? Flocking can give an old artificial tree a new lease on life. If your tree is looking tired or faded, a layer of flocking can make it feel fresh again.
You can go subtle or bold too. Light flocking for a hint of snow, or pile it on for a dramatic, snowy centerpiece.
Flocked vs. Non-Flocked Artificial Christmas Trees
A flocked artificial Christmas tree looks totally different from a non-flocked one. The flocked version has that snowy, winter vibe, while the non-flocked keeps the classic green style.
| Feature | Flocked Tree | Non-Flocked Tree |
|---|---|---|
| Appearance | Snowy, white-coated branches | Natural green branches |
| Style | Wintry, cozy, decorative | Classic, traditional |
| Ornament contrast | Ornaments stand out more | Ornaments blend with green |
| Maintenance | Needs careful storage to protect flock | Easier to clean and store |
It really comes down to personal taste. If you love that snowy holiday style, flocking’s the way to go. Prefer a classic look? Stick with green.
Choosing the Right Flocking Materials

The look and feel of our flocked tree depends a lot on the material we use. Some options give a soft, snowy dusting, while others create a thicker, more textured finish.
Picking the right product also mak es the job easier and less of a headache.
Flocking Powder Options
Flocking powder is the go-to for most people. It comes in different textures and shades of white. Most are made from cellulose fibers — safe, biodegradable, and pretty easy to find.
You can pick fine or coarse powder, depending on whether you want a light snow or a heavy, wintry look.
Usually, you’ll need water to help the powder stick. Spray the tree with water, sift the powder over the branches, and mist again to lock it in.
Some powders even have adhesive mixed in, which honestly saves a step.
Flocking Spray vs. Powder
Flocking spray comes in an aerosol can, and it’s definitely less messy than powder. It’s quick to use but usually gives a lighter, frosty look.
Sprays are great if you just want to highlight the tips of branches. They’re perfect for a quick, frosted finish.
For a deep, snowy effect, powder is the way to go.
Here’s a quick comparison:
| Material | Look | Best For | Cleanup |
|---|---|---|---|
| Powder | Thick, textured snow | Full coverage, large trees | More mess |
| Spray | Light frosted effect | Quick touch-ups, small trees | Easier |
If you’re doing a big tree, powder usually looks better. For small trees or just adding a little snow, spray is fine.
Some people keep both around, just in case.
Preparing Your Artificial Tree for Flocking
Before you start flocking, you need to prep the tree and your workspace. That means setting up a safe area, cleaning and shaping the tree, and protecting the floor and anything nearby.
Workspace Setup and Safety Tips
Flocking gets messy — fast.
If you can, choose a spot like a garage, patio, or outdoors with good airflow.
If you’re stuck indoors, open the windows and maybe set up a fan. Trust me, you’ll want the air moving.
Wear a mask to avoid breathing in flocking dust, and gloves to keep your hands from drying out. Goggles are helpful if you’re spraying or shaking powder, but not totally necessary.
Keep pets and kids out while you work. Flocking sticks to everything — fur, clothes, shoes — so the less traffic, the better.
Cleaning and Fluffing the Tree
Before flocking, the artificial tree should be clean. Wipe it down with a damp cloth or use a handheld vacuum to get rid of dust.
Next, fluff out every branch. Bend and spread them so the tree looks full and natural. Flocking lands where it lands, so if the branches are clumped together, the finished tree will look patchy.
Step back and check the shape from a few angles. Once it looks good, you’re ready for snow. Don’t skip this—fixing gaps after flocking is a pain.
Protecting Floors and Surroundings
Flocking will fall everywhere, so cover the ground first! Use a plastic drop cloth, tarp, or even old sheets. Tape the edges down so they don’t slide around as you move.
If you’re near walls or furniture, hang a sheet or use painter’s plastic to keep flocking off things you don’t want to clean later.
A little prep here saves a ton of cleanup. When you’re done, just fold up the coverings and shake them out or toss them.
How To Flock an Artificial Tree With Flocking Powder

Using flocking powder on an artificial tree is all about layering: add moisture, sprinkle powder, build it up, and let it dry.
Each step helps the flock stick, look natural, and last all season.
Misting the Branches
Start by lightly misting the tree with water. The moisture helps the powder cling to the branches instead of sliding right off. Don’t soak it; just a fine spray does the trick.
Mist the tree in sections. Start at the top and work your way down so the branches stay damp while you apply the powder.
A spray bottle with a gentle setting works best. If you spray too much, you’ll end up with drips and clumps.
Applying the Flocking Powder
With the branches damp, it’s time to add the powder!
A kitchen sifter or strainer is perfect for sprinkling it evenly. Hold it above the tree and tap gently for that soft, snowy effect.
Go light — dumping a bunch in one spot just looks fake and can weigh down the branches.
Keep your spray bottle handy. After each sprinkle, a quick mist helps the powder stick and activates any adhesive in the flocking.
Layering and Building Coverage
Flocking works best in layers. After the first round, step back and see where it looks bare. Then repeat on those spots.
Building up slowly gives you more control over the look. Some people want just a hint of snow, others want a blizzard.
Here’s a basic approach:
- Light look: One pass of powder and mist.
- Medium look: Two passes with touch-ups.
- Heavy look: Three or more passes, focusing on the tips.
Layering like this keeps things looking natural and avoids clumps.
Drying and Setting the Flock
When you’re done, let the tree dry. This is important! Move it too soon and you’ll lose a bunch of flock.
Leave it alone for at least 12 hours. For heavy coverage, 24 hours is even better. A garage or covered outdoor spot works well, since flocking can be messy.
Once dry, gently shake the branches to knock off any loose powder. Wear gloves to avoid rubbing off too much flock.
Now the tree’s ready for lights and ornaments! The snowy look should hold up just fine.
How To Flock an Artificial Tree Using Flocking Spray

Flocking spray makes it super easy to get that snowy look with minimal cleanup or special tools. The main steps: get the spray ready, apply it in light layers, and let it dry before decorating.
Preparing the Flocking Spray
Before spraying, set up your workspace. Put the tree outside or in a garage if you can, with good airflow. Lay a plastic drop cloth or old sheet under the tree to catch overspray.
Wear a mask and gloves to stay safe from the fine spray. Eye protection is smart, too. Flocking spray isn’t fun if it gets in your eyes.
Shake the can well before using. Most sprays need at least a minute of shaking so the texture comes out right.
If you’re using more than one can, keep a backup close so you don’t run out halfway through.
Spraying Techniques for Even Coverage
The trick to a natural look? Light, even coats.
Hold the can about 12 to 18 inches from the branches. Spraying too close leads to clumps, but too far and you’ll just waste product.
Start at the top of the tree and work your way down.
Short bursts are easier to control than holding the nozzle nonstop. Step back now and then to see how things look from different angles—sometimes it’s surprising what you’ll notice from across the room.
Want a heavier snowfall effect? Add more layers after the first coat sets a bit. For a lighter dusting, one thin coat usually does the job.
Just aim for the tips of the branches, so it feels like real snow landed there.
Drying and Final Touches
After you’re done spraying, let the tree dry. Most flocking sprays need 6 to 12 hours to set, though humidity can slow things down.
Try not to move the tree while it’s drying, or you’ll risk smearing the flocking. If you spot thin areas after it dries, just touch them up with a quick spray.
It’s always better to fix small sections than pile on too much at once. Once the flocking feels firm and not sticky, you can bring the tree inside.
Now it’s ready for lights, ornaments, and whatever decorations you love.
Decorating and Maintaining Your Flocked Artificial Tree

A flocked artificial Christmas tree really shines when you decorate it with care. The right lights, ornaments, and storage tricks help preserve that snowy look and keep shedding to a minimum.
Adding Lights and Ornaments
When adding lights, LED strands are the way to go. They stay cool and won’t loosen the flocking. Wrapping the lights around each branch instead of stretching them across keeps the flock from flaking off.
Ornament weight matters too. Heavy ornaments can bend branches and knock off flocking, so lighter decorations like glass balls, ribbons, or wood pieces just work better.
If you’re set on using heavier ornaments, try hanging them closer to the trunk for more support. For a balanced look, step back often and check the spread of lights and ornaments.
Filling gaps with picks, berries, or pine cones can cover thin spots without disturbing the flocking.
Touching Up and Repairing Flock
Flocking can thin out or shed over time, especially if the tree gets bumped around.
If you spot a thin patch, lightly mist it with water and sprinkle on a bit of flocking powder.
For bigger bare areas, work in layers — a light coat, then drying time, gives better results than dumping it all on at once. Let it dry for a few hours so it sticks. Just keep the spray light and even so it blends with the rest of the tree.
For tiny touch-ups, a can of flocking spray usually does the trick.
Wearing gloves helps protect the flock from oils on your hands.
Storing a Flocked Artificial Tree
Storing a flocked Christmas tree honestly takes a bit more care than your average artificial tree.
It’s a good idea to use a sturdy tree storage bag, or maybe the original box — just line it with plastic first to catch any stray flock.
You’ll want to keep the tree somewhere cool and dry. Moisture can mess up the finish, so steer clear of damp basements or stuffy, baking-hot attics.
When it’s time to pack it up, don’t squish the branches down. Fold them gently and, if you’re feeling extra cautious, add some soft packing material around the tree.
Slap a label on the container that says “flocked tree.” It’s a small thing, but it’ll help you remember to treat it gently next year.